Managing timesheets and schedules
| DMF |
5002** MOBILE TIMESHEETS * 5003** MOBILE SCHEDULES * |
From the Akuiteo Mobile application, tap from the menu bar to access the Timesheet & schedule menu.
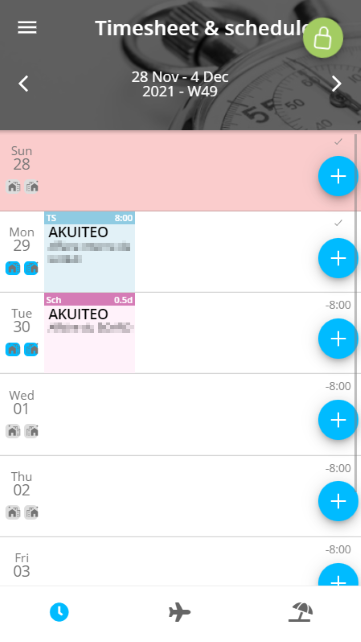
The application displays the current weekly view. Use the arrows in the header of the screen to switch from one week to another.
Timesheets and schedules are displayed in blocks in the application calendar:
- blue blocks correspond to timesheets;
- pink blocks correspond to schedules;
- gray blocks correspond to validated timesheets.
For each day, it is possible to add new timesheet or schedule blocks, by tapping  for the corresponding line. The remaining time to input for the day is indicated above each icon.
| 1 | Display the desired week in the application then tap for the relevant day. You can also tap the first icon you see and modify the date in the input form. |
| 2 | Select TIME SHEET in the application header, then fill in the following fields: |
| Date | Enter the input date. |
| Quick entry |
Tap Quick entry then tap the desired quick entry to use previously-saved values. For more information, refer to Managing quick entries. |
| Customer |
To add a customer to the input, tap the field and enter the first 3 letters of the customer's code or name in the |
| Analytical assignment |
To add an assignment to the input, tap the field and enter the first 3 letters of the project's / phase's / sub-phase's code or name in the Note If the Customer field is already filled in, you can only select a project linked to this customer. However, if the Customer field is empty, it is automatically filled in with the customer linked to the assignment. |
| Action | Select the input action code. |
| Duration | Specify the duration in hours. |
| Comment | Enter a comment about the input. |
| Place | Enter the input location, if necessary. |
 search field. The list of relevant customers is automatically displayed. You can therefore select the desired customer.
| 3 | Tap SAVE. |
 The timesheet is created and displayed as a blue block on the relevant day.
Note
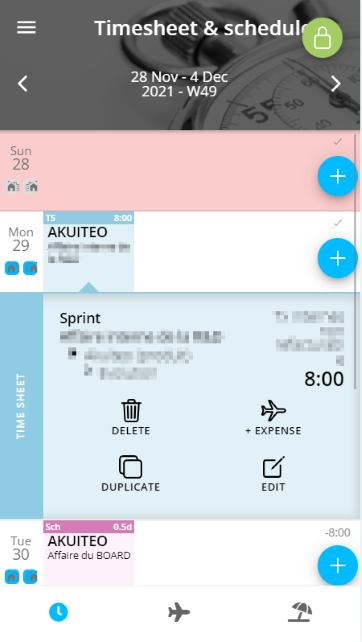
Completed or validated timesheets can no longer be modified. From a validated timesheet entry, tap DETAIL to display the non-modifiable form of the timesheet entry.
| 1 | Tap the timesheet block to modify. |
| 2 | Tap MODIFY. |
| 3 | Modify the desired information then tap SAVE to save the modifications. |
| 1 | Tap the timesheet block to duplicate. |
| 2 | Tap DUPLICATE. |
A timesheet input form opens, with the information from the source timesheet entry automatically retrieved.
| 3 | Modify the desired information then tap SAVE. |
The new timesheet entry is created on the specified date from the source entry.
| 1 | Tap the timesheet block to which the expense will be added. |
| 2 | Tap +EXPENSE. |
An expense report input form opens, with the date, the customer and the assignment automatically retrieved from the source timesheet entry.
| 3 | Specify the fields related to the expense, then tap SAVE. |
The expense is created and added to the expense report in progress.
Reference
For more information about expense input and expense reports in Akuiteo Mobile, refer to Managing expense reports.
| 1 | Tap the timesheet or schedule block to which the custom request will be added. |
| 2 | Tap +REQUEST. |
| 3 | Select the type of custom request you want to create. |
A custom request form opens, with the information of the timesheet or scheduled item retrieved automatically for the date, the customer and the assignment.
Reference
For more information about shared fields in the custom requests, refer to From an empty custom request.
| 4 | Specify the fields of the custom request then tap SAVE. |
The custom request is created but has not been transferred for approval yet. The custom request is categorized as To be requested.
A quick entry enables you to reuse the same values for a recurring task, to avoid having to constantly enter the same information.
Defining a quick entry
Note
A quick entry is defined from a timesheet entry that has not yet been completed or validated.
| 1 | Tap the desired blue block in the calendar to open the details of this timesheet entry. |
| 2 | Tap MODIFY. |
| 3 | Modify the necessary information then tap DEFINE AS QUICK ENTRY at the bottom of the form. |
| 4 | Enter a label in the Quick entry description. This label cannot be modified once the quick entry is created. To modify the label of an existing quick entry, you must delete it then recreate it with the correct label. |
| 5 | Tap VALIDATE. |
The quick entry is defined using the information from the source timesheet entry. It can be used to enter new timesheet entries. For more information, refer to Entering a timesheet entry.
Deleting a quick entry
From the My quick entries list - when creating a new timesheet entry for example - tap the desired quick entry, then slide to the left and tap DELETE.
Important
Deleting a timesheet entry cannot be reversed.
Note
Completed or validated timesheets cannot be deleted.
To delete a timesheet entry, tap the desired blue block in the calendar to open the details of this timesheet entry. You can then:
- tap DELETE then confirm the deletion.
- tap EDIT to access the input form, then tap DELETE at the bottom of the form and confirm the deletion.
Timesheets can be completed from Akuiteo Mobile to transfer them to the manager for validation. Timesheets can be completed weekly or monthly, depending on each company's needs.
The completion button is only displayed if:
- you have already enter time spent for the selected week or month;
- the timesheet of the selected week or month is not completed yet;
- the last week of the month is displayed (in case timesheets are completed monthly).
To complete timesheets:
| 1 | Tap  at the top right of the screen. at the top right of the screen. |
| 2 | Tap Mark [month or week] time sheet as completed for the selected period, then tap MARK YOUR TIME SHEET AS COMPLETED to confirm the completion. |
The timesheet is completed for the selected month or week. The entries are now displayed in gray in the calendar and can no longer be modified.
Note
If the SEMAINE_MOIS value is specified in the TPS_TERMINAISON management rule, for the last week of the month, the employee can complete timesheets both weekly and monthly.
To cancel the completion, the user must have the DMF 500201 MOBILE TIMESHEETS CANCEL COMPLETION and the timesheets must not be validated:
| 1 | Tap at the top right of the screen. |
| 2 | Tap Cancel termination for the selected period, then tap CANCEL TERMINATION to confirm the cancellation. |
The entries are no longer completed for the month or the week and can be modified.
| 1 | Display the desired week in the application then tap for the relevant day. You can also tap the first icon you see and modify the date in the input form. |
| 2 | Select SCHEDULE in the header of the application then specify the following fields: |
| Start date |
Enter the schedule's start date. Note The |
| Duration |
Specify the duration (in days) of the scheduled item. Note This field is hidden if the |
| Full day |
Note This field is only available if the Enable the Full day option if you want to schedule in full days. The start and end dates of the item can still be filled in, but the start and end times are hidden. In this case:
Examples You want to schedule an item on Monday 25: you schedule it from the 25th to the 25th and check Full day. The created item is scheduled for 1 day. You want to schedule 2 days and a half, from Monday 25 to Wednesday 27: you schedule it from the 25th to the 27th and check Full day.
|
| Customer |
To add a customer to the schedule, tap the field and enter the first 3 letters of the customer's code or name in the |
| Analytical assignment |
To add an assignment to the schedule, tap the field and enter the first 3 letters of the project's / phase's / sub-phase's code or name in the Note If the Customer field is already filled in, you can only select a project linked to this customer. On the contrary, if the Customer is not already specified, it is automatically specified when the analyticalassignment is specified. |
| Actions | Select the schedule's action code. |
| Comment | Enter a comment about the schedule. |
| Description | Enter an additional description of the schedule. |
| Place | Enter the location linked to the schedule, if needed. |
| Quarter of day |
Tap the relevant Quarter of day to indicate the moment of the day associated with the schedule. For example, if you select 1st, the schedule block will be placed at the beginning of the day. Notes This field is hidden if the If the |
| Validated | Activate this field if you want to validate the schedule. |
| Online meeting |
Enable this field if the scheduled item is supposed to happen remotely, using a videoconferencing tool. This option enables you to transfer an online meeting to an Outlook calendar using the PlanningExchange batch. Reference For more information about the batch PlanningExchange, refer to PlanningExchange batch. |
| 3 | Tap SAVE. |
The schedule is created and displayed on the relevant day of the calendar as a pink block.
| 1 | Tap the desired block to open the detail of the schedule item. |
| 2 | Tap MODIFY. |
| 3 | Modify the desired information then tap SAVE to save the modifications. |
| 1 | Tap the desired block to open the detail of the schedule item. |
| 2 | Tap DUPLICATE. |
The schedule's input form opens, with the information from the source schedule automatically retrieved.
| 3 | Modify the Start date and the desired information then tap SAVE. |
The new schedule is created on the specified date from the source schedule.
| 1 | Tap the desired block to open the detail of the schedule item. |
| 2 | Tap +EXPENSE. |
An expense report input form opens, with the date, the customer and the assignment automatically retrieved from the source schedule.
| 3 | Specify the fields related to the expense, then tap SAVE. |
The expense is created and added to the expense report in progress.
Reference
For more information about expense input and expense reports in Akuiteo Mobile, refer to Managing expense reports.
| 1 | Tap the desired block to open the detail of the scheduled item. |
| 2 | Tap +REQUEST then select the type of custom request to create. |
A custom request form opens, with the date, the customer and the assignment automatically retrieved from the source timesheet entry.
| 3 | Specify the fields of the request then tap SAVE. |
When a custom request is created, it is categorized as To be requested. It must completed from the Custom request menu then send to the manager for their validation.
Note
The action to transfer a schedule into a timesheet cannot be reversed. Once a schedule is transferred into a timesheet, that timesheet entry cannot be transferred back into a schedule.
| 1 | Tap the desired block to open the detail of the scheduled item. |
| 2 | Tap >>TIME SPENT. |
The schedule is transferred into the timesheets and is now displayed on the relevant day of the calendar as a blue block.
Important
Deleting a schedule cannot be reversed.
To delete a schedule, tap the desired schedule block to open the details of this schedule. You can then:
- tap DELETE then confirm the deletion.
- tap EDIT to access the input form, then tap DELETE at the bottom of the form and confirm the deletion.
Each day or half-day spent working remotely can be declared from the Timesheet & schedule menu in order to give this information to the employee's company.
| 1 | Display the desired week in the application, then tap the   remote work icons below the desired day. remote work icons below the desired day. |
| 2 | From the remote work screen, tap: |
-
 to declare the morning as remote work;
 -
 to declare the afternoon as remote work;
 - both icons to declare the full day as remote work.
| 3 | Tap SAVE. |
The remote work is declared for the desired half-day or full day. In the calendar, the half-days declared as remote work are identified by the  and
and  icons.
To cancel the remote work, click on and from the remote work screen to go back to gray icons.


