Custom requests
| DMF | 5007** MOBILE ** MOBILE CUSTOM REQUESTS * MOBILE CUSTOM REQUESTS* |
Important
This evolution requires enabling the following feature flag: Mobile domain > Demandes internes.
From the Akuiteo Mobile application, tap  from the menu bar to access the Custom requests menu.
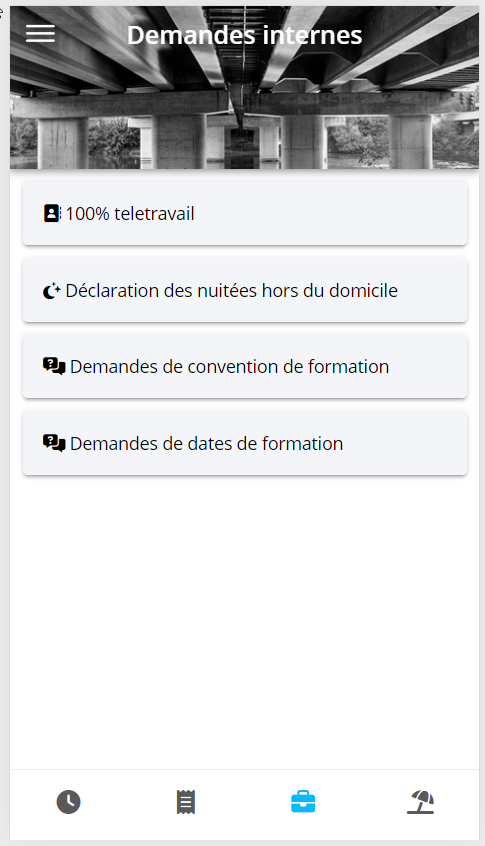
Custom requests enable employees to create specific requests depending on each company needs. For example, a company can create a category of custom request so that employees can request days of remote work, to travel for work or even to participate to a training. Each company can use as many custom request categories as needed to manage its internal processes.
When a custom request is created, it is categorized as To be requested. The employee must then complete the request in order to transfer it to the manager or any person in charge of approving these requests. The custom request is now categorized as To approve. The custom requests approved are displayed as Approved and the ones denied are displayed as Denied.
A custom request is made up of:
- a base of fields that are shared with all custom requests;
- custom data that are specific to each type of custom request.
The application displays custom request categories created and set up from the Desktop Application > Tools > Setup > General setup > Custom requests > Issue categories.
Note
In the Desktop Application, the custom request is made up of several tabs:
- a main tab which contains the fields shared with all custom requests;
- an undefined number of tab containing the custom data (that can be set up according to the company needs). Some of these custom data can be displayed on the main tab.
In the Akuiteo Mobile application, the number of custom data that can be displayed is limited. If some important custom data cannot be accessed from the custom request form, the custom request will not be usable.
In the Custom requests menu, custom requests status are displayed next to the request number. Custom request can be in the following statuses:
| Status | Description |
|---|---|
| To be requested | The custom request is created but has not been terminated nor transferred for approval yet. |
| To approve | The custom request is terminated but not transferred for approval yet. |
| Denied | The custom request created by the employee was denied by the manager. |
| Approved | The custom request created by the employee was approved by the manager. |
Custom requests can be created:
- From an empty custom request ;
- Adding custom request, to automatically retrieve all the fields specified in a time or schedule block and only modify the desired values;
- By duplicating an existing custom request.
| 1 | From the Custom requests menu, select the request type to create. |
| 2 | Tap  at the bottom right of the screen. at the bottom right of the screen. |
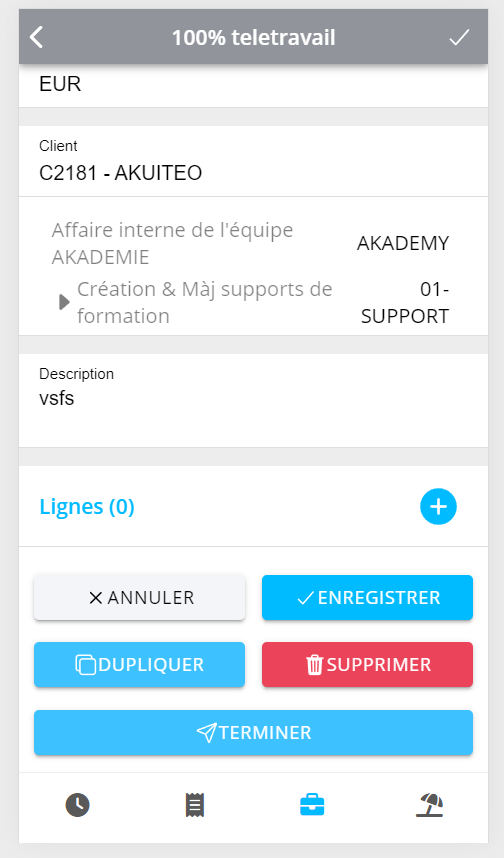
 A custom request form opens. This screen displays the fields shared with all custom requests as well as the custom data that are specific to the custom request's category.
| 3 | In the input form, add one or multiple receipts or documents linked to the custom request. For example, a training contract for a training custom request. To do so, tap  to open the file explorer and select the desired receipts. to open the file explorer and select the desired receipts. |
Tip
To avoid having to authorize the application every time you use the camera, you can manage your smartphone's authorizations from the website's parameters. To do this, open the application in a web browser from your smartphone, access the website's parameters or settings and authorize the use of the camera.
For more information, search for authorizations to use the camera depending on your OS and web browser.
| 4 | Specify the fields that are shared with all custom requests: |
| Field | Description |
|---|---|
| Call name | Give a title to the custom request. |
| Date |
Touch Example An employee wants to have a training session on March 3rd. When creating the custom request, the employee select the date March 3rd in the Date field. |
| Currency |
Select the currency from the help list. This currency will be used if the custom request implies expenses. |
| Customer |
Touch the field and specify the first 3 letters of the name or code of the customer in the |
| Assignment |
Touch the field and specify the first 3 letters of the name or code of the project, phase or sub-phase in the Note If the Customer field is already filled in, you can only select a project linked to this customer. On the contrary, if the Customer is not already specified, it is automatically specified when the analyticalassignment is specified. |
| Description |
If needed, specify a comment to give more details about the request. |
 to select the date and time of the custom request.
 search field. The list of relevant customers is automatically displayed. You can therefore select the desired customer.
| 5 | Fill in the custom data that are specific to the custom request's category. |
| 6 | Tap SAVE. |
The custom request is created but has not been transferred for approval yet. The custom request is categorized as To be requested.
An existing custom request can be duplicated to quickly create a new request with the information retrieved from the original request.
| 1 | From the Custom requests menu, touch the custom request to duplicate. At the bottom of the screen, touch DUPLICATE. |
The duplicated request screen opens.
| 2 | Modify the desired information. |
| 3 | Tap SAVE and confirm the action. |
The custom request is duplicated but has not been transferred for approval yet. The custom request is categorized as To be requested.
| 1 | Touch the custom request to modify. |
| 2 | Modify the desired information. |
| 3 | Tap SAVE. |
The custom request is modified.
Prerequisite: The request must be in the To be approved or Approved state.
| 1 | Touch the custom request to cancel. |
| 2 | At the bottom of the custom request form, tap CANCEL COMPLETION and confirm the action. |
The completion of the custom request is canceled. The request is under the To be requested status.
An employee can add one or multiple planned expenses in a custom request. For example, if it is a travel request, the employee can add the expenses planned for the travel (accommodation, transportation, meals, and so on).
| 1 | Touch the custom request to which add an expense line. |
| 2 | Under the Lines section at the bottom of the form, touch then specify the following fields: |
| Field | Description |
|---|---|
| Expense type | Select the planned expense's type from the help list. |
| Quantity and Unit price |
Fill in the quantity and the unit price for the selected type. The currency is filled in automatically with the currency selected for the custom request. |
| Expense reports | Enables the switch to automatically transfer the expected expense into an expense report on the date of the custom request. |
| Comment | Describe the expense to give more details. |
| Customer | This field is only for information and retrieves the customer and analytical assignment specified in the custom request. This field is grayed out and cannot be modified. |
| 3 | Tap SAVE. |
| 4 | At the bottom of the custom request form, touch SAVE. |
The amount of the expense appears at the right of the custom request status. A line is also added under the request, under the Lines section, retrieving the specified information of the expense.
Prerequisite: The request must be in the To be requested state.
| 1 | Touch the relevant custom request then touch the expense line under the Lines section of the form. |
| 2 | Modify the desired information. |
| 3 | Tap SAVE. |
The expense has been modified.
Prerequisite: The request must be in the Approved state.
When a custom request containing expenses lines is approved, it is possible to generate expenses in order to see it in the Expense reports menu.
| 1 | Touch the relevant custom request containing expense lines. |
| 2 | At the bottom of the form, touch GENERATE EXPENSES. |
The expense line is available in the current expense report, in the Expense reports menu. If there is no current expense report, a new expense report is created with the expense line.
Prerequisite: The request must be in the To be requested state.
| 1 | Touch the custom request containing the expense line to deleted. |
| 2 | Under the Lines section of the form, touch the expense to delete. |
| 3 | Touch DELETE. |
The expense is deleted.
Prerequisite: The request must be in the To be requested state.
When a custom request is created, it is not transferred automatically for approval to the manager. This way, the employee can still modify and fill in the request. However, the employee must request the manager approval to transfer the custom request.
| 1 | Touch the request to transfer for approval. |
| 2 | At the bottom of the form, touch COMPLETE. |
The request is terminated. It is categorized as To be approved and is to validate by your manager.
Important
Deleting a custom request cannot be reversed and also delete the linked documents.
| 1 | Touch the request to delete. |
| 2 | At the bottom of the form, touch DELETE. |
| 3 | Confirm the action. |
The custom request is deleted.


