Managing expense reports
| DMF |
5001** MOBILE * * MOBILE EXPENSE REPORTS * MOBILE EXPENSE REPORTS * |
From the Akuiteo Mobile application, tap  from the menu bar to access the Expense reports menu.
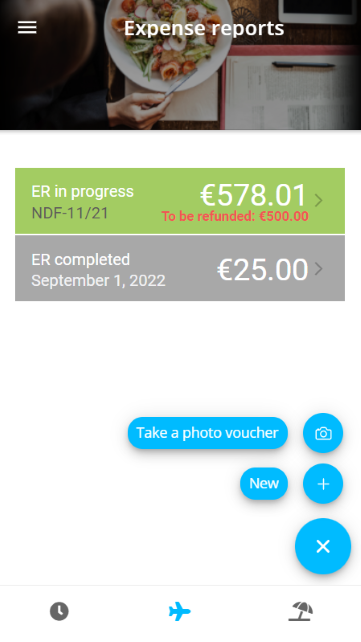
The application displays the list of the employee's expense reports. The expense reports in progress are displayed in green and completed expense reports are in gray.
It is possible to create a new expense by tapping  at the bottom right of the screen. There are two options available to create an expense:
- directly take a picture of the receipt from the application, or take an existing picture from the phone's gallery,
- manually enter the expense.
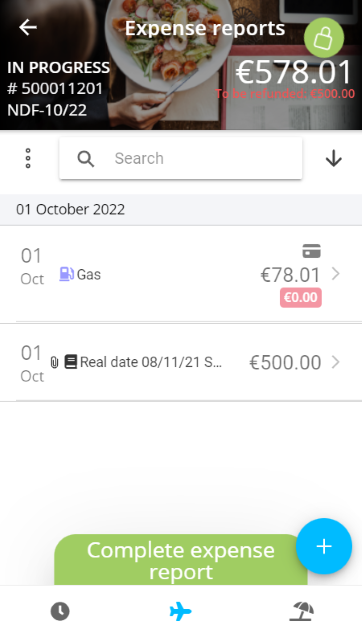
Tap the desired expense report to access its details as well as the list of linked expenses.
Note
If the amount to be refunded is different from the amount entered by the employee, the To be refunded: xxx indication is displayed.
In the expenses list:
- The
 icon indicates that some required fields are not filled in for the expense.
 - The
 icon indicates that a required receipt is missing for the expense.
 - The
 icon indicates that the expense has at least one receipt.
 - The
 icon indicates that the expense was paid using a business card.
 - The
 icon indicates that a similar expense has already been saved for this employee.
 - The
 icon indicates that a similar expense has been already saved by a different employee.
 - If the expense type has a threshold, the maximum amount is displayed in red below the amount entered for the expense.
- If an expense has been denied, the reason and the date of this denial are displayed in red below the amount entered for the expense.
Tap an expense report to access its expense details.
From the  search field, enter the first letters of the desired keyword(s). Expenses meeting the search criteria are updated in real time to quickly display searched expenses.
The expenses list can be sorted:
- Tap
 then choose the type of sorting to apply.
 - Tap
 or
or  to set the sorting order (ascending or descending).
An expense report is made up of one or multiple expense lines. By default, if there is no current expense report when the employee adds an expense line, then a new expense report is automatically created. If an expense report is already in progress, the expense line is added to the current expense report's lines.
It is possible to determine how new expenses are added: depending on the expense date, the expense will be added to the expense report of the relevant month or week, according to the setup of the NDF_PAR_PERIODE management rule.
Reference
For more information about the setup of the NDF_PAR_PERIODE management rule, refer to Managing expense reports monthly or weekly.
Reference
This documentation is about the global management of expense reports.
For more information about mileage allowances expenses, refer to Managing mileage allowances.
Tip
To avoid having to authorize the application every time you use the camera, you can manage your smartphone's authorizations from the website's parameters. To do this, open the application in a web browser from your smartphone, access the website's parameters or settings and authorize the use of the camera.
For more information, search for authorizations to use the camera depending on your OS and web browser.
| 1 | Tap at the bottom right of the screen then select New. |
| 2 | In the expense input form, fill in the following fields: |
| Receipt |
If you want to add a receipt to the expense, tap the camera at the top of the form, then select:
Important Screenshots taken on an iPhone are not compatible by default. The expense report edition is blocked. In order to make your iPhone's screenshot compatible, you have to modify this screenshot. For example, from the screenshot in your gallery, touch Modify > Auto icon > OK. After modification, the screenshot will not be blocking the expenses report edition. You can add as many receipts as necessary. Slide to the left or to the right to see added receipts. Note If adding a receipt has been set up as required for the corresponding expense type, a check is made when saving the expense. You will not be able to complete the expense report if required receipts are missing. The expenses missing a required receipt are identified with the |
| Type |
Select the expense type. This type represents the expense made: a night at the hotel, a meal at the restaurant, a highway toll, and so on. Reference For more information about the type expense setup, see Expense types. An expense report profile can be assigned to an employee. This profile is used to indicate which expense types the employee is allowed to use. This way, when the employee adds expenses, the list of expense types available is filtered. Reference For more information, refer to Defining an expense report profile. |
| Amount category | This field is only displayed if the Unit or total amount input for expenses option is checked in the setup of the selected expenditure type. In this case, the employee can choose between two options:
|
| Quantity |
This field is only displayed if the Display quantity option is checked in the setup of the selected expenditure type. When the Unit or total amount input for expenses box is checked in the expense type setup, this field is only displayed if the UNIT amount option is selected in the expense form. Specify the quantity of the expense. By default, the quantity specified is 1. If the expense type is Toll, this value cannot be modified. If the expense type is Mileage allowances, the field cannot be modified. |
| Number of parts |
This field is only displayed if the Display quantity option is checked in the setup of the selected expenditure type. When the Unit or total amount input for expenses box is checked in the expense type setup, this field is only displayed if the TOTAL option is selected in the expense form. Specify the number of parts of the expense. |
| After-tax amount |
Enter the after-tax amount of the expense. Depending on the expense type setup:
When the TOTAL option is checked, specify the total amount paid for the expense. |
| Amount (inc. VAT) |
Enter the after-tax amount of the expense. Depending on the setup for the relevant expense type:
|
| Currency |
Select the currency associated with the after-tax amount of the expense from the drop-down list. By default, the company's currency is selected. This field is hidden if the expense type is Mileage allowances. |
|
Fiscal horsepower (not displayed if Puissance Fiscale Par Vehicule feature flag enabled) |
If the expense type type is Mileage allowances, specify the fiscal power of the vehicle. |
|
Total (not displayed if Puissance Fiscale Par Vehicule feature flag enabled) |
Depending on the Fiscal horsepower and the number of KM, the expense amount is automatically calculated in the Total field. |
| Date | Enter the expense date. The current date is filled in by default. |
| Comment | Add a comment about the expense. |
| Additional comment |
This field is only displayed if the Display additional comment option is checked in the setup of the selected expenditure type. If needed, add an additional comment to the expense. |
| Guests |
If the expense type requires to add guests, add the employees or external guests associated with the expense. Tap To add an external guest, directly enter the guest name as follows: First name Last name (Company) or Last name (Company), then tap ADD. |
| VAT 1 |
Select the VAT code associated with the expense type from the drop-down list. If a single VAT rate is used, the VAT amount is automatically calculated based on the entered amount and is displayed in the Amount % field. Depending on the setup of the relevant expense type, the VAT rate can be entered by default but can still be modified. However, the VAT will not be displayed in the form if the VAT non-modifiable and not displayed option is checked in the setup of the relevant expense type. If multiple VAT rates are used, the amount of the first VAT rate must be manually entered in the Amount % field. If the expense type type is Mileage allowances, the VAT 1 field is not displayed. |
| VAT 2 |
This field is only displayed if the expense type is set up as Restaurant / Triple VAT. Select the code of the second VAT rate from the drop-down list. When multiple VAT rates are used, you must manually enter the amount associated with each VAT rate in the Amount % field. Depending on the setup of the relevant expense type, the VAT rate can be entered by default but can still be modified. You can also enter a 0% rate or delete the code if it is not relevant. Example An employee enters an expense of 20 euros for a meal at a restaurant:
He selects a first VAT code at 10% and enters "1.36" in the associated Amount % field. He then selects the second VAT code at 20% and enters "0.83" in the associated Amount % field. If the expense type type is Mileage allowances, the VAT 2 field is not displayed. |
| VAT 3 |
This field is only displayed if the expense type is set up as Restaurant / Triple VAT. Select the code of the third VAT rate from the drop-down list. When multiple VAT rates are used, you must manually enter the amount associated with each VAT rate in the Amount % field. Depending on the setup of the relevant expense type, the VAT rate can be entered by default but can still be modified. You can also enter a 0% rate or delete the code if it is not relevant. Example An employee enters an expense of 35 euros for a meal at a restaurant:
He selects a first VAT code at 10% and enters "1.30" in the associated Amount % field. He then selects a second VAT code at 20% and enters "1.65" in the associated Amount % field. Finally, he selects a third VAT code at 5.5% and enters "0.56" in the associated Amount % field. If the expense type type is Mileage allowances, the VAT 3 field is not displayed. |
| Amount non submitted to the VAT |
This field is only visible if the Include an amount non-submitted to the VAT option is checked for this type of expense. Enter the amount non submitted to the VAT for your expense line, if needed. |
| Customer |
To add a customer to the expense, tap the field and enter the first 3 letters of the customer's code or name in the If a client by default is defined in the Default allocation field of the employee's record sheet, it is filled automatically (see Entering general information and contact details). |
| Analytical assignment |
To add an assignment to the expense, tap the field and enter the first 3 letters of the project's / phase's /sub-phase's code or name in the If a project / phase / sub-phase is defined in the Default allocation field of the employee's record sheet, it is filled automatically (see Entering general information and contact details). Note If the Customer field is already filled in, you can only select a project linked to this customer. However, if the Customer field is empty, it is automatically filled in with the customer linked to the assignment. |
| Business card | Enable this field to mark the expense as "paid with a business card". The expense line will be identified by the icon. |
| Rebillable |
This option is only displayed if the Rebillable displayed option is checked in the setup of the selected expenditure type. Enable this field if you want to be able to rebill the expense to the selected customer. |
| Non-refundable | Enable this field if the expense must not be refunded. |
| Voucher No. |
This field is only displayed if the Display receipt number is checked on the expense type. Fill in the number of the receipt added to the expense. |
| 3 | Tap SAVE. |
 The expense is created and added to the relevant expense report.
| 1 | Tap at the bottom right of the screen then select Take a photo voucher. |
| 2 | Take a picture of the receipt. You can also open the photo gallery of your phone to use an existing picture. |
| 3 | Once the receipt is selected or photographed, tap the Fill in myself option, then fill in the required fields and save. |
The expense is created and added to the relevant expense report.
Important
The Smartscan must be enabled and set up from the Administration console;
Akuiteo provides an Optical Character Recognition (OCR) system to simplify the process of adding expenses to an expense report. When a receipt is photographed, the characters are automatically recognized and are then added in the expense's relevant fields.
| 1 | Tap at the bottom right of the screen then select Take a photo voucher. |
| 2 | Once the receipt is selected or photographed, tap the Smartscan option. |
The Smartscan is launched. The process to recognize characters in the selected receipt can take a while. The associated expense is automatically created in the relevant expense report.
Important
You must check the information in the created expense as well as the values detected by the Smartscan. Some values can be incorrect and others can be missing if the Smartscan was not able to successfully recognize the characters.
An existing expense can be duplicated from an expense report in progress to quickly create a new expense.
| 1 | To duplicate an expense: |
- From the details of an expense report in progress, tap the desired expense then slide to the left. Tap DUPLICATE, then tap DUPLICATE to confirm the duplication.
- From the expense form, tap DUPLICATE at the bottom of the screen then tap DUPLICATE to confirm duplication.
A form opens for the new expense. All the fields from the source expense are retrieved.
| 2 | Modify the desired information in the form. |
| 3 | Tap SAVE. |
The new expense is created and added to the relevant expense report.
An expense can be moved from an expense report to another one, if they are both in progress. For example, this feature can be used if there was a mistake on an expense date and this expense should be in another expense report.
| 1 | To move an expense: |
- From the details of an expense report in progress, tap the desired expense by sliding it to the left then tap MOVE.
- From the expense form, tap MOVE at the bottom of the screen.
| 2 | If needed, modify the expense date in the New date field. |
| 3 | Select the expense report in progress to which the expense must be moved or tap NEW EXPENSE REPORT to quickly create a new expense report. |
The expense is moved to the selected expense report.
Important
Deleting an expense cannot be reversed.
Expenses can be deleted at any time as long as they are in an expense report in progress. Once the expense report is completed, expenses can no longer be deleted.
To delete an expense:
- From the details of an expense report in progress, tap the desired expense then slide to the left. Tap
 then tap DELETE to confirm the deletion.
 - From the expense form, tap DELETE at the bottom of the screen.
| 1 | From the details of an expense: |
- tap COMPLETE EXPENSE REPORT at the bottom of the screen;
- tap
 at the top right of the screen.
| 2 | Tap MARK YOUR TIME SHEET AS COMPLETED to confirm the completion. |
The expense report is completed and is grayed out in the list of expense reports. Expenses associated with that expense report can no longer be modified, duplicated, moved or deleted.
To cancel the completion, the connected user must have the DMF 500101 MOBILE EXPENSE REPORTS CANCEL COMPLETION and the expense report must not be validated.
| 1 | From the details of a completed expense: |
- tap CANCEL TERMINATION at the bottom of the screen;
- tap
 at the top right of the screen.
| 2 | Tap OK to confirm the cancellation. |
The expense report is now in progress.


