| DMF |
020202 SALES QUOTATIONS MODIFY 020226 SALES QUOTATIONS MODIFY QUOTATION SUBMITTED FOR APPROVAL 020213 SALES QUOTATIONS MODIFY VALIDATED QUOTATION 020217 SALES QUOTATIONS MODIFY SIGNED QUOTATION 020225 SALES QUOTATIONS MODIFY UNSIGNED ORDERED QUOTATION 020234 SALES QUOTATIONS MODIFY REVIEWED QUOTATION |
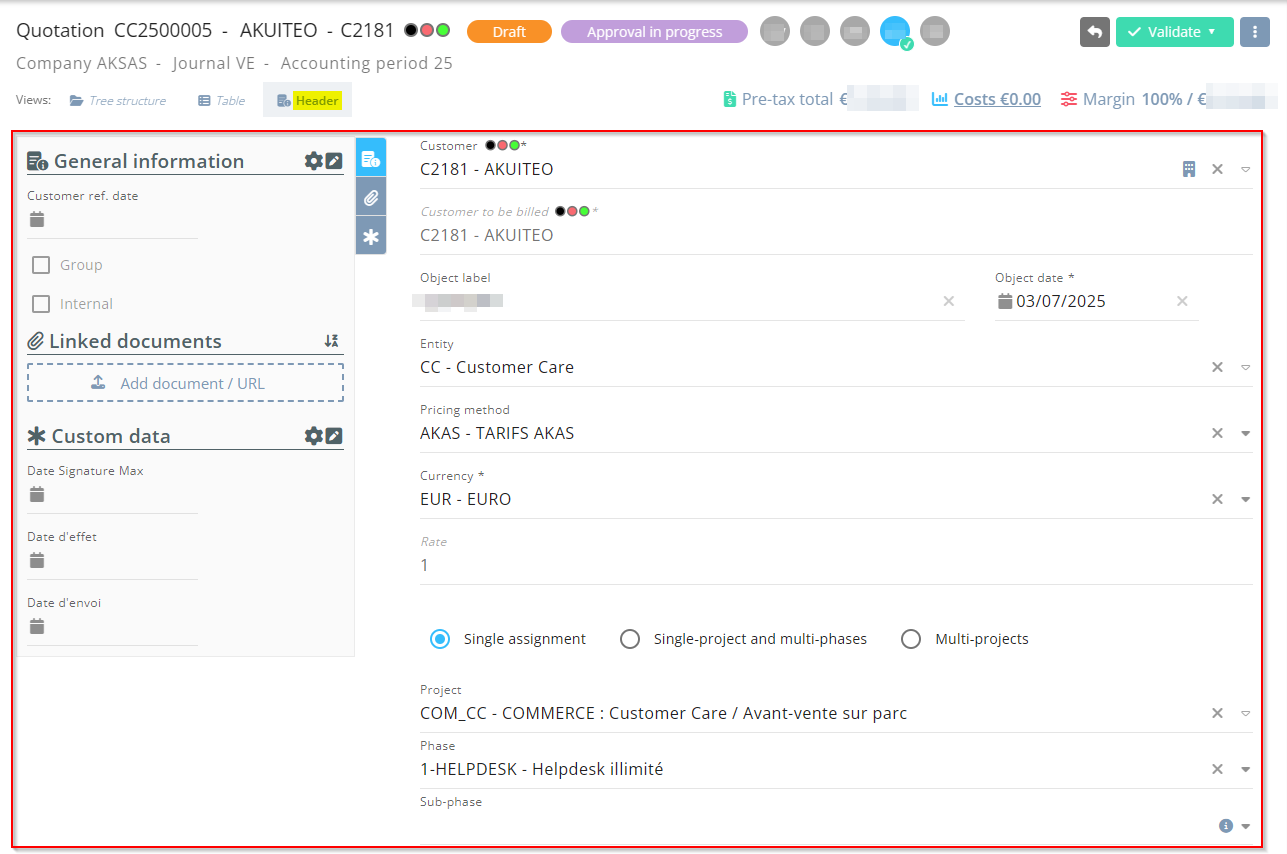
Click on Header from the tabs to display header information and the pane that is used to manage various information about the quotation (quick accesses, Chorus, linked documents, etc.).
Important
In order to modify a validated quotation, the DC_MAJ_VALID or MAJ_PIECE_VALIDmanagement rule must be enabled and the connected user must have the DMF 020213 SALES QUOTATIONS MODIFY VALIDATED QUOTATION.
The Header tab is used to access and modify the following information:
| Section | Field | Description |
|---|---|---|
| Object details | Object label | The label of the object is specified when creating the quotation (see Creating a quotation). |
| Object date | The date of the object is specified when creating the quotation (see Creating a quotation). | |
| Main Customer and Customer to be billed |
The main Customer and the Customer to be billed are specified when creating the quotation (see Creating a quotation). The main Customer can only be modified when the quotation is in creation. To modify the Customer to be billed, refer to Modifying the customer to bill on a quotation. The customers' color indicators are displayed. Click on
Note The link to the CRM module or the Sales Portal must be correctly initialized in the Administration console (see Setting up the Launcher). This icon is only visible to users who have the DMF 1915** WEB PORTAL ORGANIZATIONS & CONTACTS *. |
|
| Entity | The entity is specified when creating the quotation (see Creating a quotation). | |
| Pricing | Currency | The currency is specified when creating the quotation (see Creating a quotation). |
| Rate |
Exchange rate between the company currency and the object currency. The field cannot be modified and is calculated from the selected Object date and Currency. It is recalculated each time one of these fields is modified. The rate is determined according to the following order of priority:
|
|
| Pricing method | The pricing method is specified when creating the quotation (see Creating a quotation). | |
| Assignment | Assignment type and, if applicable, Project/Phase/Sub-phase of the quotation |
Assignment information are specified when creating the quotation (see Creating a quotation). Note If the quotation is in the Draft or Validated state, only projects/phases/sub-phases whose status code allows the Unsigned quotation object type can be specified. If the quotation is in the Signed or Order not signed state, only projects/phases/sub-phases whose status code allows the Signed quotation and unsigned quotation processed as orders and Unsigned quotation object type can be specified. |
| Notes | Text on object |
Text of the quotation. This free-form field is used to indicate additional information to the customer. Tip In the Text on object, you can insert a table text (refer to Using table texts). |
 to open the main Customer's sheet or the Customer to be billed's sheet.
From the pane of the Header tab of a quotation, The My quick accesses section allows you to add quick-access fields related to the quotation’s general information and custom data for faster access. From that section, a window can be opened to access all general information and custom data of the quotation.
Fields in quick acces
Click on  at the right of the My quick accesses section from the pane in order to set up the fields to display in quick access. Fields in quick access are specific to each user. From the setup window:
- On the left, the list displays fields and custom data available to be added in quick access.
- On the right, the list displays fields and custom data in quick access. Select a field from the list then drag and drop it to modify the order of the fields.
Drag and drop a field from one list to the other to add it in quick access or remove it from quick access. Click on the  or
or  icons to add or remove all fields at once.
Separators can be added in order to split quick accesses in separate sections. To add a separator, drag and drop the Title / Separator field from the left list to the desired location in the list on the right. A label can be specified in order to define a title for the separator. If the label is not specified, the separator will be displayed without a title.
Click on Apply to take into account the modifications.
Custom data
Click on  at the right of My quick accesses section from the pane to display custom data of the object in a specific window. Depending on custom data setup, the window contains one or more tabs/sections/fields.
Reference
For more information about custom data setup, refer to Custom data.
Modify the desired data then click on Validate.
General information
Click on  at the right of My quick accesses section from the pane to display all general information of the object in a specific window.
Make necessary modifications and click on Validate.
The following information can be displayed and/or modified:
| Field | Description |
|---|---|
| Customer ref. date |
Reference date at the customer. This information is only for informational purposes. |
|
Validity duration (months) |
Validity duration granted to the customer to sign the quotation. |
| Internal and Group |
Allows you to indicate if the quotation is an Internal or Group quotation. This information cannot be modified. |
| Journal |
The journal is specified when creating the quotation (see Creating a quotation). This field cannot be modified and cannot be added as quick access. |
| Theoretical margin |
Theoretical margin of the quotation. This information is only for informational purposes. |
| Internal number |
The internal number is specified when creating the quotation (see Creating a quotation). This field cannot be modified and cannot be added as quick access. |
| Opportunity |
Opportunity linked to the quotation. The help list displays opportunities linked to the customer of the quotation and to the selected Pipeline. Click on
This icon is only visible to users who have the DMF 1914** WEB PORTAL OPPORTUNITIES *. |
|
Source |
Allows you to indicate if the quotation is related to a sub-contracting or co-contracting context. The field is empty if the quotation is not related to a sub-contracting or co-contracting context. This field cannot be modified. |
| Pipeline |
Opportunity pipeline linked to the quotation. The help list displays pipelines in the company of the quotation and in the ***** company. |
| Probability and Weighted coef. |
Probability of a signature from the customer. The Weighted coef. is updated automatically based on the selected Probability. The coefficient is based on a scale of 0 to 1: 0 corresponding to an unlikely signature and 1 corresponding to a likely signature. Reference For more information about the setup of weighted coefficients, refer to Weighting coefficients. |
| Customer reference 1 to Customer reference 3 |
References at the customer. This information is only for informational purposes. |
| Manager |
Manager of the quotation. This field is used to define the approver corresponding to the Object's company manager in the approvals setup of quotations. The help list displays non-generic employees present at the company on the date of the quotation. |
| Sales manager and Technical manager |
Sales manager and technical manager of the quotation. The help lists display non-generic employees at the company of the quotation and present on the date of the quotation. This information is only for informational purposes. |
| Expected signature date | Date of the expected signature by the customer. |
| Actual signature |
This field is only visible if the Actual date of signature by the customer. |
| Commission rate |
Commission rate of the salesperson in charge of the quotation. This information is only for informational purposes. |
 to open the opportunity record sheet:
Important
This section is only displayed if the CHORUS application control is enabled.
Form the pane of the Header view of the object, the Chorus section contains the fields related to the interface with Chorus PRO:
| Field | Description |
|---|---|
| Contract number | Contract number associated with the object. |
| Project group name | Name of the project group associated with the object. |
| Commitment number |
Chorus legal commitment number. This number links the object and Chorus billing. |
| Effective date | Effective date of the commitment, the contract or the project group. |
| Service code |
Code of the billing site's Chorus service. When the billing site is specified or modified on the object, the service code on the object is automatically updated with the one from the billing site specified. The field can be modified manually on the quotation |
| Service label |
Label of the billing site's Chorus service. When the billing site is specified or modified on the object, the service code on the object is automatically updated with the one from the billing site specified. The field can be modified manually on the quotation |
Reference
For more information about the use and the setup of Chorus PRO, refer to Introduction to Chorus.
| DMF |
1001** OFFICE AUTOMATION WRITE WRITE 100107 OFFICE AUTOMATION WRITE NEW DOCUMENT (OR DRAG&DROP) or 100108 OFFICE AUTOMATION WRITE NEW DOCUMENT 100109 OFFICE AUTOMATION WRITE MODIFY DOCUMENT 100110 OFFICE AUTOMATION WRITE DELETE DOCUMENT |
From the pane of the Header tab of a quotation, the Linked documents section contains the documents linked to the quotation, for example a report or a link to a help desk issue. Click on the name of the document to open its preview, or hover over the name of a document to display its details (creation date, last modification date, users who created and last modified the document, etc.).
To add a document:
- Click on the Add document / URL frame then select the document from the file browser.
- Drag and drop the document in the Add document / URL frame. This feature requires the DMF 100107 OFFICE AUTOMATION WRITE NEW DOCUMENT (OR DRAG&DROP).
Quick actions available from the Linked documents
When a document is added to a management object, the following features are available from  on the right of the document:
From the Linked documents section, you can realize several actions:
- To download a document, click on then on Download. This action allows you to download the document on the computer. This option is only available if the document is not a hypertext link. The document can also be downloaded directly by clicking on the name of the document if it is not an image, a PDF or a hypertext link.
- To open a link, click on then on Open link. This action allows you to open a hypertext link in a new tab. This option is only available if the document is a hypertext link.
- To unlink a document, click on then on Unlink. This action allows you to remove the document. The document is no longer linked to the management object but the document's record sheet associated is kept in Akuiteo.
- To delete a document, click on then on Delete. The document record sheet associated is also deleted from Akuiteo.
Actions available from the Show details function
When a document is added to a management object, the Show details function is accessible under the list of documents linked to the quotation. The table which opens allows you to obtain more information on the document and the following actions are available in the Actions column:
- To visualize a document, click on
 . This action allows you to visualize a document before downloading it on the computer. This option is only available if the document is an image, a .txt file or a PDF document.
 - To download a document, click on
 . This action allows you to download the document on the computer. This option is only available if the document is not a hypertext link. The document can also be downloaded directly by clicking on the name of the document if it is not an image, a PDF or a hypertext link.
 - To open a link, click on
 ; This action allows you to open the URL in a new tab in the browser. This option is only available if the document is a hypertext link.
 - To delete a document, click on then on Delete document. This action allows you to delete the document. The document record sheet associated is also deleted from Akuiteo.
- To lock or unlock a document, click on then on Lock/Unlock. This action allows you to lock or unlock a document. This option is only available if the document is not a hypertext link. When a document is locked, the
 icon is displayed on the document record sheet in the Desktop Application.
 - To file a document, click on then on Filed under. This action allows you to specify one or several keywords linked to the document. From the documents search screen (Desktop Application > Tools > Documents), a user can specify the keywords in the Filed under field in order to easily find the relevant document.
- To archive or de-archive a document, click on then on Archive/De-archive. This action allows you to archive or de-archive the document.


