A project can be structured into phases, sub-phases and tasks.
- Phases and sub-phases are recommended when analyzing a project.
- Project tasks should be used for scheduling.
Tip
To ensure optimal consistency between your project and your analyses, it is important to use the same structure for all your projects.
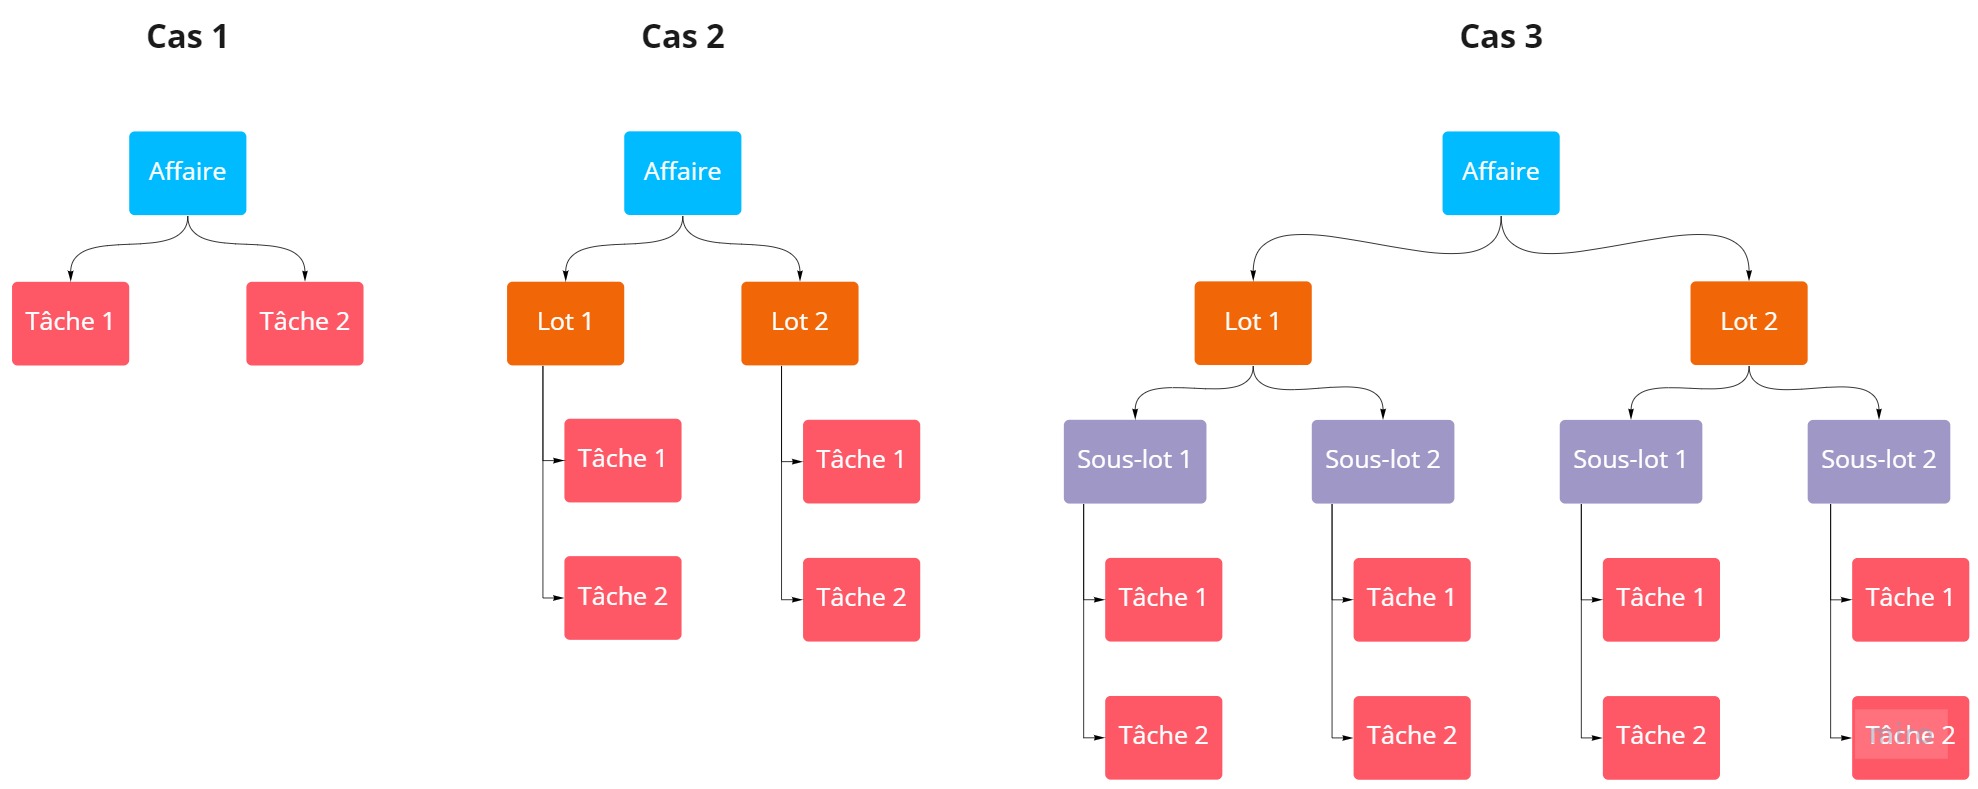
Example
- Projects: Development (DEV)
- Phase 1: main version
- Sub-phase 1.1: Minor version 1
- Sub-phase 1.2: Minor version 2
- Task: Development (DEV)
Prerequisites: The project status code must be set up from Tools > Setup > General setup > Project > Project status code. You can set up multiple state codes.
| 1 | Go to Management > Projects >  and select your project's state code (e.g. internal, production, commercial, etc.). and select your project's state code (e.g. internal, production, commercial, etc.). |
| 2 | In the Project section, drag and drop a logo in Logo if needed, then specify: |
- the project's unique code (10 characters max.). This code is automatically generated if you have set up the Automatic management objects numbering for the AFF type;
- the project's call name, to search for this project and that will be displayed in the project's reports;
- if the project is recurrent or not. This criterion allows you to identify the projects likely to be duplicated each year. Projects can still be duplicated, whether they are recurrent or not.
- whether the project can be duplicated to the following year. The Do not duplicate checkbox on a project is available only if a year is specified for the project. This applies only to individual and batch duplication of year-based projects. The Duplicate the current project function is still available. This box is checked automatically if the Do not allow projects duplication box is checked on the project status code record sheet.
- the project's project group. If the project group's code specified in the project record sheet does not exist, it is generated from the project's code;
- the initial budget, for information purposes only. If the project was created from an opportunity, the lines total is displayed in this field;
- the project's reference language and country.
| 3 | In the Customer section, specify the information linked to the project's customer. By default, a project can only be linked to a single customer. The Customer group is automatically specified with the value specified in the customer or prospect record sheet (General tab > Identity section) and cannot be modified. |
| 4 | Check Multi-customer to be able to add multiple customers afterwards. The customer indicated in the Customer field is the project's main customer. |
| 5 | However, you can modify a project's customer if no invoice was validated from Edit > Project administration > Change the customer for the project menu. |
| 6 | In the Managers section, specify the Sales, Financial, Production and Project managers. |
Note
When the COLLAB_GEN_AFF management rule is enabled, generic resources can be defined on the Sales manager and Project manager fields.
| 7 | In the End customer section, specify the code of the customer who initiated the project. By default, the customer is the end customer. Note that only the customer for the project is displayed by default. |
| 8 | In the Calendar section, specify: |
- the actual start date of the pre-sales phase in Prospection start.
- the initial, expected and actual signature dates of the order, in First signature.
- the initial, expected and actual dates of production start, in Production Start. When creating a project, you must specify the expected production start date to display the project in the graphic schedule. The production start date indicates the project is in progress.
- the initial, expected and actual dates for the end of production, in Production end.
Note
Once the project's production starts. the actual date must be specified to display the project in the graphic schedule and to be able to update the expected date when reviewing the project. If the control setup is enabled, you must not specify any information on the project after indicating the actual date.
| 9 | In the Classification section, specify: |
- the company's entity to which the project is assigned. When searching for management objects by entity (order, invoice, accounting entries, etc.), the search will be done according to the entity of the project linked to the management object;
- the department to which the project is linked and the company's activity;
- the project's family and sub-family, based on the type of contracts (e.g. project, maintenance, support, package distribution).
- The project year.
| 1 | Click on the Additional information tab. |
| 2 | Specify the management data: |
- Internal: internal project or cost project. To do this, you must associate the project with an internal customer (in the Finances tab of the customer record sheet). If a project is associated with an internal customer and the Internal option is not checked, it is an indirect external project (R&D and investment projects that will result in direct external projects).
- Leave: enables you to create a Leave management project (Leaves, Reduction in working hours, Sick leaves, etc.).
- Inventory: the project uses an inventory management, you must therefore specify the deposit code.
- IT equipment: the project uses an IT equipment management. The Inventory and IT equipment boxes cannot be both checked at the same time.
- Exonérée de TVA sur les ventes : Cochez la case si les lignes des pièces de vente sont exonérées de TVA pour cette affaire.
- Training: enables you to create a Training management project.
- Fiscal: to distribute indirect costs: fiscal values (data potentially used in analytical financial position statements).
- Accountant: to distribute indirect costs: accounting values (data potentially used in analytical financial position statements).
- Pricing method: the pricing method used for billing timesheets and rebilling expense reports.
- Budget: enables you to specify the initial budget, for information purposes only (not used by the application). This budget is the same as the one in the first tab. As such, any change in the value automatically impacts the other field.
- Budget revision index: cannot be specified (This index is automatically incremented when the project's budget is reviewed).
- Rating number: the project's rating number (for information purposes only; can be used to save the physical document number related to the project).
- Project type: the grouping code, with no restriction for data entry.
| 3 | Select the project status for sub-contracting: |
- N/A: non applicable, not concerned by the subcontracting.
- Pilot: pilot project for the subcontracting.
- Service provider: project provider for the subcontracting.
- Co-contractor: co-contracting project, which corresponds to carrying out a project jointly within one or several companies.
| 4 | When Heures Centiemes feature flag and the PLG_HHCC management rule are enabled, select the Workload unit task (by default) for the project: |
- Task in days - default unit;
- Task in hundredth hours.
| 5 | Specify the contractual payment terms and conditions |
- Payment method: select a payment method from the drop-down list.
- No. Days: the number of days, starting from the delivery date.
- On: the payment date.
- Bank journal: the bank journal (in accounting) chosen for the payment.
- Analytical flows not supported: when this box is checked, the flows management is disabled for this project.
- Currency: the currency used.
| 6 | Specify the No. Days in the Holdback section. This number of days enables you to calculate the due date for holdbacks associated with the project. If this field is empty, the information is retrieved from the customer or supplier record sheet. |
| 7 | Specify the project's description if necessary. |
| 8 | Specify the code of the action to be added in the list of the Actions permitted for the project section. Only actions indicated in this table will be allowed for the project. |
| 9 | Specify the fields of the Payment schedules generation rule section if you want to automatically apply a payment schedule to invoices linked to this project: |
Important
The payment schedule set up on a project cannot be applied to multi-project invoices.
| Option | Description |
|---|---|
| Generate payment schedule on single-project invoices |
Check the box to enable the payment schedule on invoices linked to the project. The payment schedule will be calculated and added no matter how the invoice is created (manually, from an order, intra-group rebiling, etc.). Due dates are displayed in the Due dates tab of invoices. |
| Number of due dates | Specify the field in order to set the number of due dates in which the amount of each invoice will be paid. |
| Periodicity | Select the periodicity of due dates (monthly, quarterly, etc.). |
| End of month | Check the box if you want the due dates to always be fixed on the last day of the month. |
Note
When the payment schedules is set up on contracts, customers and/or projects at the same time, Akuiteo determines the payment schedule to take into account based on the following priority order:
- The payment schedule on the contract if the invoice originates from a contract for which a payment schedule is set up;
- Or else, the payment schedule set up on the project record sheet;
- Or else, the payment schedule set up on the customer record sheet.
The payment schedule set up on a project cannot be used if the invoice is multi-project. In that case, the payment schedule set up on the customer will be taken into account if it is set up.
In the context of sub-contracting, rebilling and co-contracting, service projects must be created from the pilot project record sheet.
| 1 | In the Internal/Grouup services tab, go to the modification mode then click on  . . |
| 2 | Specify the following fields: |
| Field | Description |
|---|---|
| Sub-contracting typ |
Select the sub-contracting type to apply to the pilot project from the drop-down list. Internal: indicates an internal sub-contracting. The internal subcontracting matches the rebilling between two divisions or entities of the same company. Group: indicates a group sub-contracting. The group subcontracting matches the rebilling between two companies, divisions or entities of two different groups. Co-contractor: indicates a co-contractor. Co-contracting project matches the carrying out a project jointly within one or several companies. |
| Company | From the drop-down list, select the company on which the supplier project must be created. |
| State code |
This field is automatically specified by Akuiteo when saving. |
| Project code | This field is automatically specified by Akuiteo when saving. |
| Project name | The pilot project name is automatically retrieved by Akuiteo and cannot be modified. |
| Closing |
This field is automatically specified by Akuiteo when saving. |
| Service provider customer name | From the help list, select the service provider customer to link to it. |
| Service provider project customer cod |
From the help list, select the service provider customer code to link to it. |
| Comment | If needed, specify a comment. |
| Mgr | Select the manager from the help list. |
| Financer | Select the finance manager from the help list. |
| Production | Select the production manager from the help list. |
| Entity | Select the entity from the help list. |
| Division |
This field is automatically specified by Akuiteo when saving. |
| Department | Select the department linked to the supplier project from the help list. |
| Activity | Select the activity linked to the supplier project from the help list. |
| Family | Select the family linked to the supplier project from the help list. |
| Sub-family | Select the sub-famil linked to the supplier project from the help list. |
| 3 | Click on  . . |
 The supplier project is linked to the pilot project.
Click on the Customers tab.
This tab displays the list of all the customers linked to the project, including the main customer. To be able to add customers to the list, you must have checked the Multi-customer box in the Main information tab.
Check Hide closed customers to hide closed customers (customers with a Closure date in the column of the customers table). When this box is not checked, closed customers are displayed.
Check the relevant boxes for when the project will be used for management objects, depending on the billing method, and the implied expense reports and purchases.
This tab enables you to link one or multiple services of the company to the project (services must have been created in the Setup module).
| 1 | Click on the Services tab. |
| 2 | Search for services in the yellow field then select the relevant service. |
| 3 | To delete a service, click on the deletion icon or right-click on the desired service and select Delete service. |
| 1 | After saving the new project, click on the Phases and project tasks tab. |
| 2 | Perform the following operations and save: |
| 1 | Click on  . . |
| 2 | Click on the Phase details sub-tab and specify the following information: |
- Phase code
- Call name: the phase's call name.
- Manager: the manager's name.
- State code: the phase's state code.
- Rank #: the phase's rank number.
- Quote number: the phase's quote number.
- Customer contact: the customer's contact name.
- Name and contact details of the phase's host site. You can choose an already configured site by clicking on
 .
. - Expected and actual start and end dates.
- Additional description of the phase
| 3 | Click on the Custom Data tab and specify the phase's custom information - that you can set up via Tools > Setup > General setup > Project > Custom phases data. |
| 4 | Click on the Linked documents tab to add a new linked document to the phase. |
| 5 | Click on the Linked events tab, then on the arrow to the right of the icon to link an event (appointment, task or note) to the project's phase. |
| 1 | Select a phase, then click on  . . |
| 2 | Click on the Sub-phase details sub-tab and specify the following information: |
- Phase code: the code of the phase to which the sub-phase belongs.
- Sub-phase code: the sub-phase's code.
- Call name: the sub-phase's call name.
- Manager: the manager's name.
- State code: the sub-phase's state code.
- Rank #: the sub-phase's rank number.
- Expected and actual start and end dates.
- Sub-phase additional description.
| 3 | Click on the Custom Data tab and specify the phase's custom information - that you can set up via Tools > Setup > General setup > Project > Custom sub-phases data. |
| 4 | Click on the Linked documents tab to add a new linked document to the sub-phase. |
| 5 | Click on the Linked events tab, then on the arrow to the right of the icon to link an event (appointment, task or note) to the project's sub-phase. |
| 1 | Click on  . . |
| 2 | Click on the Project task details sub-tab and specify the following information: |
- Normal task: a task with a time duration.
- Fixed milestone: an occasional task.
- Non-fixed Milestone: an occasional task that is not fixed.
- Project manager: manager of the task.
- Linked employee: employee who must do the task.
- Sales price per hour (if the Feature flag Heures centièmes is enabled): hourly sales price of the task.
- Daily sales price: daily sales price of the task.
- Standard number of days per month: number of days t o work on this task per month, as a fixed -price.
- Phase: the code of the phase to which the task belongs.
- Sub-phase: the code of the sub-phase to which the task belongs.
- Label: the task's or milestone's label.
- Rank #: the task's rank number.
- The task's location.
- Additional comment about the task.
- Start and end dates.
- Cost (d) or Cost (HHhh) (when the feature flag Heures centiemes and the
PLG_HHCCmanagement rule are enabled): value of budget. - Excess or Excess (HHhh) (when the feature flag Heures centiemes and the
PLG_HHCCmanagement rule are enabled): excess authorized on the task, in hours minutes or hours hundredth. - Remaining or Remaining (HHhh) (when the feature flag Heures centiemes and the
PLG_HHCCmanagement rule are enabled): remaining on the task, in hours minutes or in hours hundredth. - Automatic remaining tasks: When the box is checked, the remaining tasks duration cannot be specified manually and is automatically calculated when saving the task using the following formula:
Remaining tasks = Workload + Excess – Timesheets not 'BRUT' and not rejected.
- Risk level: evaluates the progress risk level.
- Related skills: the skill(s) required to perform the task.
| 3 | Click on the Employees sub-tab and select the employee who can specify the task. |
The Accounting position tab is a context tab. It can be opened from a project, via Edit > Dashboard > Accounting > Accounting position.
This feature enables you to display three tables linked to the project:
- Sales invoice list: this table displays the list of the project's sales invoices (paid and not paid) as well as the project's total amount.
- Purchase invoice list: this table displays the list of the project's purchase invoices and total amount.
- Receipt list: this table displays all the project's booked receipts.
By default, this tab is not displayed.
| 1 | After saving the new project, click on the Contacts tab. |
| 2 | Click on the arrow to the right of the  icon to add different contacts to the project: icon to add different contacts to the project: |
- New contact: displays a window to create contacts using basic information (email, names and site).
- Customer contacts: displays the contacts of the project's customer.
- Contacts in the directory: displays a search window in your directory.
- Customers: displays a window to search for customers.
- Directories: displays a window to search for customers in your directory.
- Resources: displays a list of your employees.
| 3 | To remove contacts, right-click on the contact then select Delete the association. |
| 4 | To quickly send an email to a contact, right-click on the contact then select Send an email to the selected contacts. |
| 5 | To set a contact as the main contact or as the sold-to-party, right-click on the contact and select the relevant option. |
The responsibilities of a project's control manager are set up in control templates. Alert messages are displayed in the Interactive personal dashboard and the control manager is the only one allowed to specify time on the project (schedules and timesheets). For more information, see Defining control templates.
| 1 | After saving the new project, click on the Controls manager tab. |
| 2 | Click on to add a new employee. The selected employee's control tasks are displayed. |
| 3 | To delete the control manager, click on  . . |
Only the employees linked to the project can add timesheet entries, schedules and expense reports to the project. Your project is therefore partitioned and secured.
| 1 | After saving the new project, click on the Linked resources tab. |
| 2 | Search for an employee in the yellow field, then select the desired employee. The selected employee is automatically added in the table. |
| 3 | To delete an employee, click on the employee then on  . . |
The Duplicate the current project feature consists in creating a new Project record sheet based on the previous project's content.
Click on Edit > Duplicate the current project, or go to  from the action bar > Duplicate the current project.
Reference
To duplicate year-based projects, refer to Duplicating year-based projects.


